Friday, November 18, 2022

DBT on Cloud Composer (Apache Airflow)

Introduction

Cloud Composer is managed service by Google Cloud Platform for Apache Airflow. DBT is an open source tool for transformation of Data in ETL

You can read more about DBT and DBT Core here  and Cloud Composer here 

There is no good document for DBT integration with Cloud Composer. I would like to share my learning for DBT integration with Cloud Composer.

Install DBT and Airflow-dbt PYPI Package

The airflow-dbt and dbt-bigquery pypi packages will install the required library for running DBT in Cloud Composer.

dbt-bigquery 1.1.0
airflow-dbt 0.4.0
You can install these packages from Terraform or Console using link


Click edit button and mention the above pypi dependency. 

DBT DAG

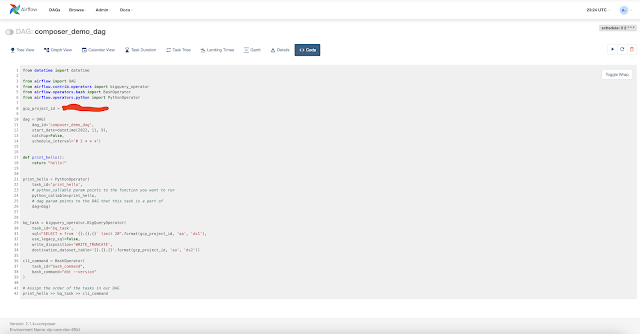
Once the dependencies are installed create below DAG as dp_obs.py

from datetime import datetime

from airflow import DAG
from airflow.contrib.operators import bigquery_operator
from airflow.operators.bash import BashOperator
from airflow.operators.python import PythonOperator

gcp_project_id = "my_gcp_project_id"

dag = DAG(
    dag_id='composer_demo_dag',
    start_date=datetime(2022, 11, 9),
    catchup=False,
    schedule_interval='0 2 * * *')


def print_hello():
    return "hello!"


print_hello = PythonOperator(
    task_id='print_hello',
    # python_callable param points to the function you want to run
    python_callable=print_hello,
    # dag param points to the DAG that this task is a part of
    dag=dag)


bq_task = bigquery_operator.BigQueryOperator(
    task_id='bq_task',
    sql="SELECT * from `{}.{}.{}` limit 20".format(gcp_project_id, 'aa', 'ds1'),
    use_legacy_sql=False,
    write_disposition='WRITE_TRUNCATE',
    destination_dataset_table='{}.{}.{}'.format(gcp_project_id, 'aa', 'ds2'))

cli_command = BashOperator(
    task_id="bash_command",
    bash_command="dbt --version"
)

# Assign the order of the tasks in our DAG
print_hello >> bq_task >> cli_command

Upload DAG to Composer

You can upload DAG to Composer using gcloud or console.

 
gcloud composer environments storage dags import --environment  my-composer-envt-6f0d  --location us-central1 --source dp_obs.py

Airflow-UI Status

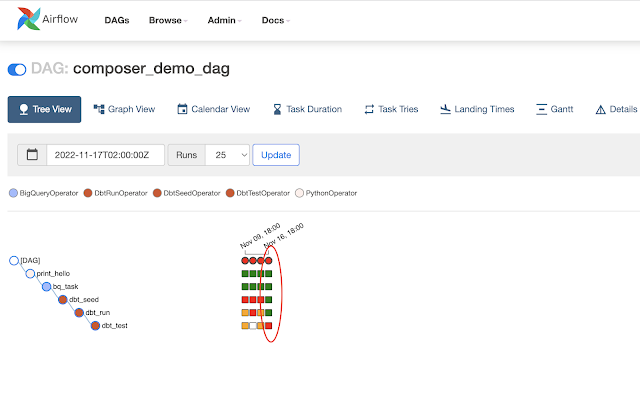
The DAG is deployed as shown below.


DAG executed successfully.


Let's check logs of the DAG


DBT and Cloud Composer are working good.

Airflow DBT Operators

For airflow-dbt operators to work we will have to create some file structure needed by operators. 


We can upload this file structure to GCS Bucket of cloud composer:

gsutil -m cp -R first_project gs://us-central1-my-composer-envt-6f0-35e280a2-bucket/dags

The DAGs folder on GCS Bucket will look like below

Drill Down of first_project folder on GCS.


DAG with Airflow-DBT Operators


I updated my DAG as below:

from datetime import datetime

from airflow import DAG
from airflow.contrib.operators import bigquery_operator
from airflow.operators.bash import BashOperator
from airflow.operators.python import PythonOperator
from airflow_dbt.operators.dbt_operator import (
    DbtSeedOperator,
    DbtRunOperator,
    DbtTestOperator
)

gcp_project_id = "my_gcp_project_id"

dag = DAG(
    dag_id='composer_demo_dag',
    start_date=datetime(2022, 11, 9),
    catchup=False,
    schedule_interval='0 2 * * *')


def print_hello():
    return "hello!"


print_hello = PythonOperator(
    task_id='print_hello',
    # python_callable param points to the function you want to run
    python_callable=print_hello,
    # dag param points to the DAG that this task is a part of
    dag=dag)


bq_task = bigquery_operator.BigQueryOperator(
    task_id='bq_task',
    sql="SELECT * from `{}.{}.{}` limit 20".format(gcp_project_id, 'aa', 'ds1'),
    use_legacy_sql=False,
    write_disposition='WRITE_TRUNCATE',
    destination_dataset_table='{}.{}.{}'.format(gcp_project_id, 'aa', 'ds2'))

cli_command = BashOperator(
    task_id="bash_command",
    bash_command="dbt  run --project-dir /home/airflow/gcs/dags/first_project/ --profiles-dir /home/airflow/gcs/dags/first_project/"
)

dbt_seed = DbtSeedOperator(
    task_id='dbt_seed',
    profiles_dir='/home/airflow/gcs/dags/first_project/',
    dir='/home/airflow/gcs/dags/first_project/'
)

dbt_run = DbtRunOperator(
    task_id='dbt_run',
    profiles_dir='/home/airflow/gcs/dags/first_project/',
    dir='/home/airflow/gcs/dags/first_project/'
)

dbt_test = DbtTestOperator(
    task_id='dbt_test',
    profiles_dir='/home/airflow/gcs/dags/first_project/',
    dir='/home/airflow/gcs/dags/first_project/'
    # dag=dag,
    retries=0,  # Failing tests would fail the task, and we don't want Airflow to try again
)

# Assign the order of the tasks in our DAG
print_hello >> bq_task >> dbt_seed >> dbt_run >> dbt_test

I am using the Cloud Composer's Sevice Account to interact with BigQuery using gcloud_default_connection.

first_project:
  outputs:
    dev:
      dataset: aa
      job_execution_timeout_seconds: 300
      job_retries: 1
      location: US
      method: oauth
      priority: interactive
      project: my_gcp_project_id
      threads: 1
      type: bigquery
  target: dev
Testing DAG on Cloud Composer

The DAG run successfully. I wanted the last task to fail as it don't meet the Data Quality Check.

Logs of DbtTestOperator are below:


Please post your queries below.

Happy Coding


Monday, January 24, 2022

Running Spark on Kubernetes on Minikube

Start Minikube

minikube start --memory 8192 --cpus 4

Download spark and set SPARK_HOME

cd $SPARK_HOME

K8S_SERVER=$(k config view --output=jsonpath='{.clusters[].cluster.server}')

Build the spark image in Docker Daemon inside the Minikube

eval $(minikube docker-env)

docker build -t spark:latest -f kubernetes/dockerfiles/spark/Dockerfile .

Check Docker Image

$ docker images spark REPOSITORY TAG IMAGE ID CREATED SIZE spark latest 3686fa10e74a 3 months ago 529MB

Start the spark-shell using below command.

./bin/spark-shell \

  --master k8s://$K8S_SERVER \

  --conf spark.kubernetes.container.image=spark:latest \

  --conf spark.kubernetes.context=minikube \

  --conf spark.kubernetes.namespace=spark \

  --verbose

Error like "unable to find valid certification path to requested target"

Start Kubectl Proxy

$ kubectl proxy

Starting to serve on 127.0.0.1:8001

Change --master to --master k8s://http://localhost:8001 and start spark-shell again.

scala> spark.version

res0: String = 3.1.2


scala> sc.master

res1: String = k8s://http://localhost:8001


scala> val values = List(List("1", "One") ,List("2", "Two") ,List("3", "Three"),List("4","4")).map(x =>(x(0), x(1)))

values: List[(String, String)] = List((1,One), (2,Two), (3,Three), (4,4))


scala> val df = spark.createDataFrame(values.map(e => Tuple2(e._1, e._2))).toDF("col1", "col1")

df: org.apache.spark.sql.DataFrame = [col1: string, col1: string]


scala> df.show()

+----+-----+

|col1| col1|

+----+-----+

|   1|  One|

|   2|  Two|

|   3|Three|

|   4|    4|

+----+-----+


scala> df.count()

res3: Long = 4


scala> df.first()

res4: org.apache.spark.sql.Row = [1,One]


./bin/spark-submit \

  --master k8s://http://localhost:8001 \

  --deploy-mode client \

  --name a1 \

  --class org.apache.spark.examples.SparkPi \

  --conf spark.kubernetes.container.image=spark:latest \

  --conf spark.kubernetes.driver.pod.name=a1 \

  --conf spark.executor.instances=1 \

  --conf spark.kubernetes.driver.limit.cores=1 \

  --conf spark.executor.cores=1 \

  --conf spark.executor.memory=500m \

  --conf spark.kubernetes.namespace=spark \

  --conf spark.kubernetes.authenticate.driver.serviceAccountName=spark-serviceaccount \

  --verbose \

  local:///Users/aagarwal/dev/spark/examples/jars/spark-examples_2.12-3.1.2.jar 10

Thursday, January 13, 2022

Running Node Port Service on Kubernetes

 We will be running the below deployment.yaml on minikube.

apiVersion: apps/v1
kind: Deployment
metadata:
 name: helloweb
 labels:
   app: hello
spec:
 selector:
   matchLabels:
     app: hello
 template:
   metadata:
     labels:
       app: hello
   spec:
     containers:
     - name: hello-app
       image: gcr.io/google-samples/hello-app:1.0
       ports:
       - containerPort: 8080
Applied above deployment using below command:
$ kubectl apply -f deployment.yaml
deployment.apps/helloweb created
Check the status using below command:
$ kubectl get all
NAME                            READY   STATUS    RESTARTS   AGE
pod/helloweb-5dfb8764bf-9k7ss   1/1     Running   0          9s

NAME                 TYPE        CLUSTER-IP   EXTERNAL-IP   PORT(S)   AGE
service/kubernetes   ClusterIP   10.96.0.1    <none>        443/TCP   86d

NAME                       READY   UP-TO-DATE   AVAILABLE   AGE
deployment.apps/helloweb   1/1     1            1           9s

NAME                                  DESIRED   CURRENT   READY   AGE
replicaset.apps/helloweb-5dfb8764bf   1         1         1       9s

This will create helloweb application.

We will expose the above application using node port service. The node port service opens a port on node and maps it to node/cluster ip.

apiVersion: v1
kind: Service
metadata:
  name: helloweb-svc
  labels:
    app: hello
spec:
  type: NodePort
  ports:
  - port: 9080
    targetPort: 8080
  selector:
    app: hello

This maps the application target port 8080 to port 9080.

Create node port service using below command:
$  kubectl apply -f service-nodeport.yaml
service/helloweb-svc created
 
Check the status using below command:
$ kubectl get all
NAME                            READY   STATUS    RESTARTS   AGE
pod/helloweb-5dfb8764bf-9k7ss   1/1     Running   0          52s

NAME                   TYPE        CLUSTER-IP    EXTERNAL-IP   PORT(S)          AGE
service/helloweb-svc   NodePort    10.97.186.9   <none>        9080:31467/TCP   4s
service/kubernetes     ClusterIP   10.96.0.1     <none>        443/TCP          87d

NAME                       READY   UP-TO-DATE   AVAILABLE   AGE
deployment.apps/helloweb   1/1     1            1           52s

NAME                                  DESIRED   CURRENT   READY   AGE
replicaset.apps/helloweb-5dfb8764bf   1         1         1       52s        

The node port service maps the 9080 to 8080 using node port 31647.

We can see the application in browser by port forwarding to 7080 using below command:
$  kubectl port-forward service/helloweb-svc 7080:9080
Forwarding from 127.0.0.1:7080 -> 8080
Forwarding from [::1]:7080 -> 8080
Handling connection for 7080


Open the browser  http://localhost:7080/ :


You can also access using minikube service command:
$   minikube service helloweb-svc
|-----------|--------------|-------------|---------------------------|
| NAMESPACE |     NAME     | TARGET PORT |            URL            |
|-----------|--------------|-------------|---------------------------|
| default   | helloweb-svc |        9080 | http://192.168.49.2:31467 |
|-----------|--------------|-------------|---------------------------|
🏃  Starting tunnel for service helloweb-svc.
|-----------|--------------|-------------|------------------------|
| NAMESPACE |     NAME     | TARGET PORT |          URL           |
|-----------|--------------|-------------|------------------------|
| default   | helloweb-svc |             | http://127.0.0.1:56345 |
|-----------|--------------|-------------|------------------------|
🎉  Opening service default/helloweb-svc in default browser...
❗  Because you are using a Docker driver on darwin, the terminal needs to be open to run it.
This will open browser and run the service.

Running it on GKE:


We can create a cluster using below command:
$  gcloud container clusters create hello-cluster --num-nodes=1 --zone "us-central1-c" --project "jovial-honor-327604"
Once the cluster is created open terminal and run below command:
$  gcloud container clusters get-credentials hello-cluster --zone "us-central1-c"
Create deployment and service using above steps. This will launch the service with External-IP you can use this node IP to access the service from the browser by opening the node port on the firewall.

$  kubectl get service helloweb-svc --output yaml
spec:
    ...
    ports:
    - nodePort: 30876  # external-ip; http://ip-1:30876; http://ip-2:30876 ....
      port: 80         # cluster-ip:port; http://cluster-ip:80/
      protocol: TCP
      targetPort: 8080 # application port
    selector:
using the NodePort from above to open firewall:

$  gcloud compute firewall-rules create test-node-port --allow tcp:NODE_PORT

In your browser's address bar, enter the following:

NODE_IP_ADDRESS:NODE_PORT

Happy Coding !!!