Showing posts with label Big Data. Show all posts

Friday, November 18, 2022

DBT on Cloud Composer (Apache Airflow)

Introduction

Cloud Composer is managed service by Google Cloud Platform for Apache Airflow. DBT is an open source tool for transformation of Data in ETL

You can read more about DBT and DBT Core here  and Cloud Composer here 

There is no good document for DBT integration with Cloud Composer. I would like to share my learning for DBT integration with Cloud Composer.

Install DBT and Airflow-dbt PYPI Package

The airflow-dbt and dbt-bigquery pypi packages will install the required library for running DBT in Cloud Composer.

dbt-bigquery 1.1.0
airflow-dbt 0.4.0
You can install these packages from Terraform or Console using link


Click edit button and mention the above pypi dependency. 

DBT DAG

Once the dependencies are installed create below DAG as dp_obs.py

from datetime import datetime

from airflow import DAG
from airflow.contrib.operators import bigquery_operator
from airflow.operators.bash import BashOperator
from airflow.operators.python import PythonOperator

gcp_project_id = "my_gcp_project_id"

dag = DAG(
    dag_id='composer_demo_dag',
    start_date=datetime(2022, 11, 9),
    catchup=False,
    schedule_interval='0 2 * * *')


def print_hello():
    return "hello!"


print_hello = PythonOperator(
    task_id='print_hello',
    # python_callable param points to the function you want to run
    python_callable=print_hello,
    # dag param points to the DAG that this task is a part of
    dag=dag)


bq_task = bigquery_operator.BigQueryOperator(
    task_id='bq_task',
    sql="SELECT * from `{}.{}.{}` limit 20".format(gcp_project_id, 'aa', 'ds1'),
    use_legacy_sql=False,
    write_disposition='WRITE_TRUNCATE',
    destination_dataset_table='{}.{}.{}'.format(gcp_project_id, 'aa', 'ds2'))

cli_command = BashOperator(
    task_id="bash_command",
    bash_command="dbt --version"
)

# Assign the order of the tasks in our DAG
print_hello >> bq_task >> cli_command

Upload DAG to Composer

You can upload DAG to Composer using gcloud or console.

 
gcloud composer environments storage dags import --environment  my-composer-envt-6f0d  --location us-central1 --source dp_obs.py

Airflow-UI Status

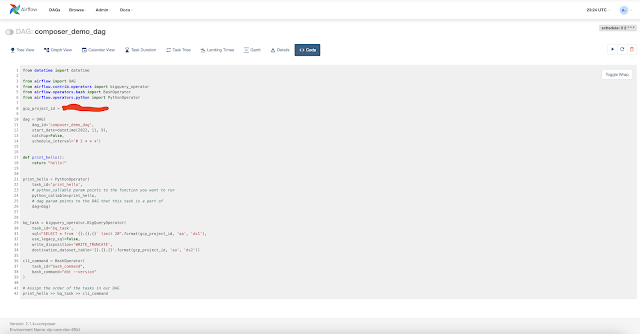
The DAG is deployed as shown below.


DAG executed successfully.


Let's check logs of the DAG


DBT and Cloud Composer are working good.

Airflow DBT Operators

For airflow-dbt operators to work we will have to create some file structure needed by operators. 


We can upload this file structure to GCS Bucket of cloud composer:

gsutil -m cp -R first_project gs://us-central1-my-composer-envt-6f0-35e280a2-bucket/dags

The DAGs folder on GCS Bucket will look like below

Drill Down of first_project folder on GCS.


DAG with Airflow-DBT Operators


I updated my DAG as below:

from datetime import datetime

from airflow import DAG
from airflow.contrib.operators import bigquery_operator
from airflow.operators.bash import BashOperator
from airflow.operators.python import PythonOperator
from airflow_dbt.operators.dbt_operator import (
    DbtSeedOperator,
    DbtRunOperator,
    DbtTestOperator
)

gcp_project_id = "my_gcp_project_id"

dag = DAG(
    dag_id='composer_demo_dag',
    start_date=datetime(2022, 11, 9),
    catchup=False,
    schedule_interval='0 2 * * *')


def print_hello():
    return "hello!"


print_hello = PythonOperator(
    task_id='print_hello',
    # python_callable param points to the function you want to run
    python_callable=print_hello,
    # dag param points to the DAG that this task is a part of
    dag=dag)


bq_task = bigquery_operator.BigQueryOperator(
    task_id='bq_task',
    sql="SELECT * from `{}.{}.{}` limit 20".format(gcp_project_id, 'aa', 'ds1'),
    use_legacy_sql=False,
    write_disposition='WRITE_TRUNCATE',
    destination_dataset_table='{}.{}.{}'.format(gcp_project_id, 'aa', 'ds2'))

cli_command = BashOperator(
    task_id="bash_command",
    bash_command="dbt  run --project-dir /home/airflow/gcs/dags/first_project/ --profiles-dir /home/airflow/gcs/dags/first_project/"
)

dbt_seed = DbtSeedOperator(
    task_id='dbt_seed',
    profiles_dir='/home/airflow/gcs/dags/first_project/',
    dir='/home/airflow/gcs/dags/first_project/'
)

dbt_run = DbtRunOperator(
    task_id='dbt_run',
    profiles_dir='/home/airflow/gcs/dags/first_project/',
    dir='/home/airflow/gcs/dags/first_project/'
)

dbt_test = DbtTestOperator(
    task_id='dbt_test',
    profiles_dir='/home/airflow/gcs/dags/first_project/',
    dir='/home/airflow/gcs/dags/first_project/'
    # dag=dag,
    retries=0,  # Failing tests would fail the task, and we don't want Airflow to try again
)

# Assign the order of the tasks in our DAG
print_hello >> bq_task >> dbt_seed >> dbt_run >> dbt_test

I am using the Cloud Composer's Sevice Account to interact with BigQuery using gcloud_default_connection.

first_project:
  outputs:
    dev:
      dataset: aa
      job_execution_timeout_seconds: 300
      job_retries: 1
      location: US
      method: oauth
      priority: interactive
      project: my_gcp_project_id
      threads: 1
      type: bigquery
  target: dev

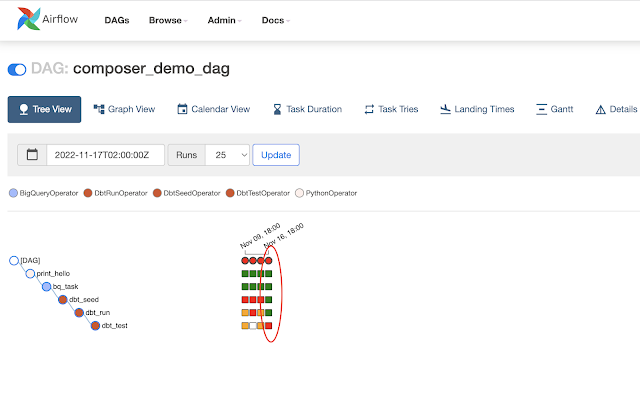
Testing DAG on Cloud Composer

The DAG run successfully. I wanted the last task to fail as it don't meet the Data Quality Check.

Logs of DbtTestOperator are below:


Please post your queries below.

Happy Coding


Tuesday, January 10, 2017

Spark Kafka Integration use case

Apache Spark

Apache Spark is distributed computing platform that provides near real time processing of data from various data sources. The  data sources can vary from HDFS file system or Kafka or Flume or Relational Database.

There are many spark components which facilitate the integration with various data sources such as Spark SQL, Spark Streaming, Mlib, GraphX.

Apache Kafka

Apache Kafka is distributed fault tolerant streaming platform that used to build the real-time data pipeline. It works on publisher and subscriber model.

Use Case

Recently, I worked on Kafka Spark integration for a simple fraud detection real time data pipeline. In this, we were tracking the Customer Activity and purchase events of Customer on e-Commerce site.Then, based on purchase events we were categorizing suspiciously fraudulent Customers. Now, we were filtering the Customer Activity for interested customer and then performing operations which is consumed by another stream for further processing.

We have consider many implementation plan and one of them is explained below.

Data Model (Just an example)

Suspicious Fraudulent Customer (demo1):


Customer_Id
Receive Flag
Name
Sex
Age
City
1
A
AAA
F
23
Union City
2
A
BBB
M
77
San Mateo
3
F
NNN
F
33
San Francisco

Customer Activity (demo2)


Customer_Id
Page Visit
Product
1
store/5426/whats-new
1
ip/product-page/product-Desc
16503225
2
ip/product-page/product-Desc
9988334
3
search/?query=battery
3
cp/Gift-Cards
3
account/trackorder


We need to process above data and filter only active data. So sample output data will be as follows.


Cus_Id
Flag
Name
Sex
Age
City
Page Visit
Product
1
A
AAA
F
23
Union City
store/5426/whats-new
1
A
AAA
F
23
Union City
ip/product-page/product-Desc
16503225
2
A
BBB
M
77
San Mateo
ip/product-page/product-Desc
9988334


Implementation Strategy

Kafka streaming:

In this data pipeline, we were receiving 2 Kafka stream and output stream  as described below.

  1. Suspicious Fraudulent Customer (demo1)

  2. Customer Activity (demo2)

  3. Output (test-output)

Spark Streaming component:

The Spark Streaming API will integrate with Kafka topics (demo1, demo2). Now, the demo1 data will be cached in memory and update for any change in active customer or add new customer. The data from demo1, demo2 is joined together and filter for active customer which is output to 'test-output'.

  1. Subscribe Suspicious Fraudulent Customer  (demo1).

  2. Subscribe to Customer Activity (demo2).

  3. Update Suspicious Fraudulent Customer in memory (so as to reflect the update in demo1).

  4. Join data from demo1 and demo2, then filter based on flag.

  5. Perform operation on the data.

  6.  Output the result to test-output for further processing.

I have implement the demo code in scala.

The working model

Let start the Spark server and submit the Spark Job to Spark  cluster as shown below

screenshot-from-2017-01-10-20-46-20

Note: Application Id: app-20170110204548-0000 is started and running.

Now, start Kafka server and start 3 topics- demo1 (Producer), demo2(Producer), test-output(consumer).

For this tutorial, to show our use case we will be showing manual data entry.

Kafka Topic (demo1):

Screenshot from 2017-01-10 20-58-51.pngKafka Topic(demo2):

Screenshot from 2017-01-10 20-59-08.png

Kafka Topic (test-output): Receive output as shown below:

Screenshot from 2017-01-10 21-02-32.pngNote: customer 3 is inactive so it will not be shown.

Now, there are changes in demo1 and will add new active customer 4 and update customer 2  to inactive and also change customer 3 to active as shown below:

[kafka@localhost kafka_2.11-0.10.1.0]$ bin/kafka-console-producer.sh --broker-list localhost:9092 --topic demo1
4,A NNN F 33 San Francisco
2,F TTT F 22 XXX
3,A HHH M 56 MMM

Then, input some Customer Activity (demo2)

[kafka@localhost kafka_2.11-0.10.1.0]$ bin/kafka-console-producer.sh --broker-list localhost:9092 --topic demo2
1,store/5426/whats-new
2,ip/product-page/product-Desc 16503225
3,ip/product-page/product-Desc 9988334
4,search/?query=battery
4,cp/Gift-Cards
3,account/trackorder

Finally, output will show transaction of all active customer  in memory Customer 1,3,4.

[kafka@localhost kafka_2.11-0.10.1.0]$ bin/kafka-console-consumer.sh --bootstrap-server localhost:9092 --topic test-output
(4,(A NNN F 33 San Francisco,search/?query=battery ))
(4,(A NNN F 33 San Francisco,cp/Gift-Cards ))
(3,(A HHH M 56 MMM,ip/product-page/product-Desc 9988334))
(3,(A HHH M 56 MMM,account/trackorder))
(1,(A AAA F 23 Union City,store/5426/whats-new ))

I hope you follow the use case. In case of any questions, please mail me, I would be glad to help you.

Thursday, December 22, 2016

Install Cloudera Hue on CentOS / Ubuntu


Introduction

Hue is Hadoop User Experience which provides web based interface to Hadoop and its related services. Its light weight web server based on Django python Framework.

hue-ecosystem
Image courtesy gethue

Create group and user hue

[code language="java"]

[root@localhost ~]$ sudo groupadd hue
[root@localhost ~]$ sudo useradd --groups hue hue
[root@localhost ~]$ sudo passwd hue
[root@localhost ~]$ su - hue

[/code]

Download the Hue Tarball 3.11

[code language="java"]

wget https://dl.dropboxusercontent.com/u/730827/hue/releases/3.11.0/hue-3.11.0.tgz
tar xvzf hue-3.11.0.tgz

[/code]

Create soft link

[code language="java"]

ln -s hue-3.11.0 hue

[/code]

The hue needs to build on the machine. The following pre-requisite needs to be installed.

[code language="java"]

sudo yum install ant gcc g++ libkrb5-dev libffi-dev libmysqlclient-dev libssl-dev libsasl2-dev libsasl2-modules-gssapi-mit libsqlite3-dev libtidy-0.99-0 libxml2-dev libxslt-dev make libldap2-dev maven python-dev python-setuptools libgmp3-dev gcc-c++ python-devel cyrus-sasl-devel cyrus-sasl-gssapi sqlite-devel gmp-devel openldap-devel mysql-devel krb5-devel openssl-devel python-simplejson libtidy libxml2-devel libxslt-devel

[/code]

Some of the packages are for ubuntu  also.

[code language="java"]

cd hue
make apps

[/code]

The build will take time.

The installation can be tested by below command

[code language="java"]

[hue@localhost hue]$ ./build/env/bin/hue runserver
Validating models...

0 errors found
December 22, 2016 - 21:59:57
Django version 1.6.10, using settings 'desktop.settings'
Starting development server at http://127.0.0.1:8000/
Quit the server with CONTROL-C.

[/code]

Open http://localhost:8000/

screenshot-from-2016-12-22-22-01-05

Quit the server by cntrl+C

Edit  hdfs-site.xml and add below

[code language="java"]

<property>
<name>dfs.webhdfs.enabled</name>
<value>true</value>
</property>

[/code]

Edit core-site.xml and add below config

[code language="java"]

<property>
<name>hadoop.proxyuser.hue.hosts</name>
<value>*</value>
</property>
<property>
<name>hadoop.proxyuser.hue.groups</name>
<value>*</value>
</property>

[/code]

Change the hue/desktop/conf/hue.ini

[code language="java"]

[hadoop]

# Configuration for HDFS NameNode
# ------------------------------------------------------------------------
[[hdfs_clusters]]
# HA support by using HttpFs

[[[default]]]
# Enter the filesystem uri
fs_defaultfs=hdfs://localhost:8020

# NameNode logical name.
## logical_name=

# Use WebHdfs/HttpFs as the communication mechanism.
# Domain should be the NameNode or HttpFs host.
# Default port is 14000 for HttpFs.
## webhdfs_url=http://localhost:50070/webhdfs/v1

[/code]

Check the config from: hadoop/etc/hadoop/core-site.xml

[code language="java"]

<configuration>
<property>
<name>fs.default.name</name>
<value>hdfs://localhost:9000</value>
</property>
<property>

[/code]

Test the config using below

[code language="java"]
[hue@localhost hue]$ build/env/bin/supervisor
[INFO] Not running as root, skipping privilege drop
starting server with options:
{'daemonize': False,
'host': '0.0.0.0',
'pidfile': None,
'port': 8888,
'server_group': 'hue',
'server_name': 'localhost',
'server_user': 'hue',
'ssl_certificate': None,
'ssl_certificate_chain': None,
'ssl_cipher_list': 'ECDHE-RSA-AES128-GCM-SHA256:ECDHE-ECDSA-AES128-GCM-SHA256:ECDHE-RSA-AES256-GCM-SHA384:ECDHE-ECDSA-AES256-GCM-SHA384:DHE-RSA-AES128-GCM-SHA256:DHE-DSS-AES128-GCM-SHA256:kEDH+AESGCM:ECDHE-RSA-AES128-SHA256:ECDHE-ECDSA-AES128-SHA256:ECDHE-RSA-AES128-SHA:ECDHE-ECDSA-AES128-SHA:ECDHE-RSA-AES256-SHA384:ECDHE-ECDSA-AES256-SHA384:ECDHE-RSA-AES256-SHA:ECDHE-ECDSA-AES256-SHA:DHE-RSA-AES128-SHA256:DHE-RSA-AES128-SHA:DHE-DSS-AES128-SHA256:DHE-RSA-AES256-SHA256:DHE-DSS-AES256-SHA:DHE-RSA-AES256-SHA:AES128-GCM-SHA256:AES256-GCM-SHA384:AES128-SHA256:AES256-SHA256:AES128-SHA:AES256-SHA:AES:CAMELLIA:DES-CBC3-SHA:!aNULL:!eNULL:!EXPORT:!DES:!RC4:!MD5:!PSK:!aECDH:!EDH-DSS-DES-CBC3-SHA:!EDH-RSA-DES-CBC3-SHA:!KRB5-DES-CBC3-SHA',
'ssl_private_key': None,
'threads': 40,
'workdir': None}
[/code]

Open http://localhost:8888/

Screenshot from 2016-12-22 22-26-07.png

Enter the credentials admin\admin

Screenshot from 2016-12-22 22-24-19.png

The script from https://github.com/apache/bigtop/blob/master/bigtop-packages/src/deb/hue/hue-server.hue.init to /etc/init.d/hue

[code language="java"]

vi /etc/init.d/hue
chmod +x /etc/init.d/hue

[/code]

You can start and stop using

[code language="java"]

/etc/init.d/hue start
/etc/init.d/hue stop
/etc/init.d/hue status

[/code]

Happy coding

Some References:

https://github.com/apache/bigtop/blob/master/bigtop-packages/src/deb/hue/hue-server.hue.init
https://developer.ibm.com/hadoop/2016/06/23/install-hue-3-10-top-biginsights-4-2/
https://github.com/cloudera/hue#development-prerequisites
http://gethue.com/hadoop-hue-3-on-hdp-installation-tutorial/
http://gethue.com/how-to-build-hue-on-ubuntu-14-04-trusty/
http://www.cloudera.com/documentation/enterprise/latest/topics/cdh_ig_hue_installation.html

Tuesday, December 20, 2016

Integrate Spark as Subscriber with Kafka

Apache Spark

Apache Spark is robust big data analytical computation system, that uses Hadoop (HDFS) or any streaming source like Kafka, Flume or TCP sockets as data source for computation. It is gaining popularity because it provide big data ecosystem with real-time processing capabilities.

In many real scenarios, for instance click stream data processing or recommendations to customers or managing real time video streaming traffic , there is certainly a need to move from batch processing to real time processing. Also in many such use case, there are endless requirement for robust distributed messaging system such as Apache Kafka, RabbitMQ, Message Queue, NATS and many more.

Apache Kafka

Apache Kafka is one of the well known distributed messaging system that act as backbone for many data streaming pipelines and applications.

Kafka project  support core API i.e  Producer API,Consumer API, Stream API, Connector API. We can develop  create application for publish data to a topic or consume data from a topic using these core API.

In this tutorial, I will be discuss about  spark streaming to receive data from Kafka.

Now, we can design the consumer using 2 approaches:

1. Receiver based: In this approach, a receiver object uses high level  Kafka Consumer API to fetch the data an stored in-memory which could destroyed if Spark node gets down, so we need to make sure that data received is fault intolerant.  Also, Kafka topic partitioning will increase threads to single receiver and not help parallel processing.In this, receiver object directly connect to Kafka zookeeper

2. Direct based: In this approach, code periodically pull data from Kafka brokers. Now, the Kafka is queried using Kafka simple consumer API  in specified interval for latest offset of message in each partition of a topic. Note: This offset can be defined when creating direct stream.

The direct approach has many advantages over receiver approach.

Today, I will be discussing about the Direct approach.

Prerequisites:

I assumed in this article that below components are already installed in your computer, if not, please set up them before going any further.

a. Install Kafka

b. Install Spark

c. Spark Development using SBT in IntelliJ

Let's get started

Step 1: Add link to Spark-streaming-Kafka

If you are using Scala API ,add the below dependencies to build.sbt file.

[code language="java"]
libraryDependencies += "org.apache.spark" % "spark-streaming_2.11" % "2.0.2"

libraryDependencies += "org.apache.spark" % "spark-streaming-kafka-0-10_2.11" % "2.0.2"
[/code]

If you are using Java API, add below dependency to pom.xml

[code language="java"]

<dependency>
<groupId>org.apache.spark</groupId>
<artifactId>spark-streaming_2.11</artifactId>
<version>2.0.2</version>
</dependency>

<dependency>
<groupId>org.apache.spark</groupId>
<artifactId>spark-streaming-kafka-0-10_2.11</artifactId>
<version>2.0.0</version>
</dependency>

[/code]

Step 2: Write code to pull data

In this tutorial,  have written the code in IntelliJ and running locally from it but you can also run it using spark-submit command. I will show both scala and java code, you can choose one of the two code.

The below code is scala code.

[code language="java"]
import org.apache.kafka.common.serialization.{ ByteArrayDeserializer, StringDeserializer }
import org.apache.kafka.clients.consumer.KafkaConsumer
import scala.collection.JavaConverters._

// direct usage of the KafkaConsumer
object KafkaConsumer {
def main(args: Array[String]): Unit = {
val kafkaParams = Map[String, Object](
"bootstrap.servers" -> "localhost:9092",
"key.deserializer" -> classOf[StringDeserializer],
"value.deserializer" -> classOf[StringDeserializer],
"group.id" -> "example",
"auto.offset.reset" -> "latest"
).asJava
val topics = "demo".split(",").toList.asJava
val consumer = new KafkaConsumer[Array[Byte], Array[Byte]](kafkaParams)

consumer.subscribe(topics)

consumer.assignment.asScala.foreach { tp =>
println(s"${tp.topic} ${tp.partition} ${consumer.position(tp)}")
}
while (true) {
//polling every 512 milliseconds
println(consumer.poll(512).asScala.foreach(record => print(record.value)))
Thread.sleep(1000)
}
}
}
[/code]

You can also run the same code in Java as well.

[code language="java"]

import org.apache.kafka.clients.consumer.ConsumerRecord;
import org.apache.kafka.clients.consumer.ConsumerRecords;
import org.apache.kafka.clients.consumer.KafkaConsumer;

import java.util.Arrays;
import java.util.Properties;

public class SimpleConsumer {
public static void main(String[] args) {
Properties props = new Properties();
props.put("bootstrap.servers", "localhost:9092");
props.put("group.id", "mygroup");
props.put("key.deserializer", "org.apache.kafka.common.serialization.StringDeserializer");
props.put("value.deserializer", "org.apache.kafka.common.serialization.StringDeserializer");

KafkaConsumer<String, String> consumer = new KafkaConsumer<>(props);
consumer.subscribe(Arrays.asList("demo"));

boolean running = true;
while (running) {

ConsumerRecords<String, String> records = consumer.poll(100);
for (ConsumerRecord<String, String> record : records) {
System.out.println(record.value());
}
}

consumer.close();
}
}
[/code]

Step 3: Start kafka producer

[code language="java"]

#Start zookeeper:default start port 2181
[kafka@localhost kafka_2.11-0.10.1.0]$bin/zookeeper-server-start.sh config/zookeeper.properties &
# Start brokers: default at port 9092 else change in code
[kafka@localhost kafka_2.11-0.10.1.0]$bin/kafka-server-start.sh config/server.properties &
#Create a topic demo we have selected only 1 partition and also replication factor
[kafka@localhost kafka_2.11-0.10.1.0]$bin/kafka-topics.sh --create --zookeeper localhost:2181 --replication-factor 1 --partitions 1 --topic demo
#Start Producer
[kafka@localhost kafka_2.11-0.10.1.0]$ bin/kafka-console-producer.sh --broker-list localhost:9092 --topic demo

[/code]

Step 4: Run the Subscriber code from IntelliJ

Right click and select the option Run KafkaConsumer as shown below

screenshot-from-2016-12-21-00-16-24

Step 5: Verify message on producer received by our code

Type in message on the producer console window.

screenshot-from-2016-12-21-00-22-54

Verify if our code receive message on IntelliJ console.

Screenshot from 2016-12-21 00-23-07.png

Hope you are able to follow the tutorial. Let me know if I missed any thing.

Happy Coding!!!!

Monday, December 19, 2016

Apache Kafka setup on CentOS

Apache Kafka

Apache Kafka is a distributed messaging system using components such as Publisher/Subscriber/Broker. It is popular due to the fact that system is design to store message in fault tolerant way and also its support to build real-time streaming data pipeline and applications.

In this message broker system, we create a topic(category) and list of producers which send message on a topic to brokers and then message from brokers are either broadcast or parallel processed by list of consumer registered to that topic.In this, the communication between producer and consumer are performed using TCP protocol.

ZooKeeper also integral part of the system, which help in co-ordination of distributed brokers and consumers.

This is the simple working model as shown below.

kakfa_model

In this tutorial, I will discuss the steps for installing simple Kafka messaging system.

Installing Apache Kafka

Step 1: Create user (Optional Step)

[code language="java"]

[root@localhost ~]$ sudo useradd kafka
[root@localhost ~]$ sudo passwd kafka
Changing password for user kafka.
New password:
Retype new password:
passwd: all authentication tokens updated successfully.
[root@localhost ~]$ su - kafka

[/code]

Step 2: Download tar file

Download the latest code from the link or wget the code (version 2.11) as shown below.

[code language="java"]

[kafka@localhost ~]$ wget http://apache.osuosl.org/kafka/0.10.1.0/kafka_2.11-0.10.1.0.tgz
--2016-12-19 13:10:48-- http://wget/
....
Connecting to apache.osuosl.org (apache.osuosl.org)|64.50.236.52|:80... connected.
HTTP request sent, awaiting response... 200 OK
Length: 34373824 (33M) [application/x-gzip]
Saving to: ‘kafka_2.11-0.10.1.0.tgz’

100%[======================================&amp;amp;gt;] 34,373,824 2.46MB/s in 13s

2016-12-19 13:11:01 (2.60 MB/s) - ‘kafka_2.11-0.10.1.0.tgz’ saved [34373824/34373824]

[/code]

Step 3: Untar the file

Untar the file using below command

[code language="java"]

[kafka@localhost ~]$ tar -xvf kafka_2.11-0.10.1.0.tgz

[kafka@localhost ~]$ cd kafka_2.11-0.10.1.0/

[/code]

The code base has some important directory as shown below

FolderUsage
binContains daemons to start Server, Zoopkeper, Publisher, Subscriber or create topics.
configContains properties file for each components
libsContain internal jars required by system

Step 4: Start the server

Kafka server require Zookeeper, so first start it in as shown below:

[code language="java"]

# Run the zookeeper in background process on port 2181.
[kafka@localhost kafka_2.11-0.10.1.0]$ bin/zookeeper-server-start.sh config/zookeeper.properties &
[2] 29678
[1] Exit 143 nohup bin/zookeeper-server-start.sh config/zookeeper.properties &amp;gt; logs/zookeeper_kafka.out
nohup: ignoring input and redirecting stderr to stdout

#Verify if it process is running
[kafka@localhost kafka_2.11-0.10.1.0]$ jps
29678 QuorumPeerMain
29987 Jps

[/code]

Now, start the kafka server as shown below

[code language="java"]

#Run the kafka server in background
[kafka@localhost kafka_2.11-0.10.1.0]$ bin/kafka-server-start.sh config/server.properties &
[3] 30228
...
[2016-12-19 14:46:39,543] INFO [Group Metadata Manager on Broker 0]: Finished loading offsets from [__consumer_offsets,48] in 1 milliseconds. (kafka.coordinator.GroupMetadataManager)
# Verify if server running
[kafka@localhost kafka_2.11-0.10.1.0]$ jps
29678 QuorumPeerMain
30501 Jps
30228 Kafka

[/code]

Step 5: Create a topic

Let create a topic "demo" with single partition and single replica as shown below

[code language="java"]

#Create topic "demo"
[kafka@localhost kafka_2.11-0.10.1.0]$ bin/kafka-topics.sh --create --zookeeper localhost:2181 --replication-factor 1 --partitions 1 --topic demo
Created topic "demo".
#Verify if topic exists
[kafka@localhost kafka_2.11-0.10.1.0]$ bin/kafka-topics.sh --list --zookeeper localhost:2181
demo

[/code]

Step 6: Create a  producer

Kafka comes with a command line producer that can take input from file or from keyboard input.

[code language="java"]

#Run the producer to send message on topic demo
[kafka@localhost kafka_2.11-0.10.1.0]$ bin/kafka-console-producer.sh --broker-list localhost:9092 --topic demo
[/code]

Step 7: Create a consumer

Kafka comes with command line consumer that show the message on console

[code language="java"]

#Receive message on consumer
[kafka@localhost kafka_2.11-0.10.1.0]$ bin/kafka-console-consumer.sh --bootstrap-server localhost:9092 --topic demo

[/code]

Hope you were able to setup the basic kafka messaging system. Please let me know i you face any issues while configuring.

Happy Coding!!!!

Friday, December 16, 2016

Remote Run Spark Job on Hadoop Yarn

Apache Spark

Apache Spark is one of the powerful analytical engine to process huge volume of data using distributed in-memory data storage.

Apache Hadoop Yarn

Hadoop is well-known as distributed computing system that consists of  Distributed file system (HDFS), YARN (Resource management framework), Analytical computing job (such as Map Reduce, Hive,Pig, Spark etc).

Apache Spark analytical job  can be run on Standalone Spark Cluster or YARN cluster or Mesos cluster.

In this tutorial, I will go through details steps and problem facing while setting up Spark job to run on  remote YARN cluster. Since, I have just one computer, I have create 2 users (sparkuser & hduser).  Now, Hadoop is installed as 'hduser' and Spark installed as 'sparksuser'.

Step 1:  Install Hadoop 2.7.0 cluster with  hduser

Please refer to tutorial for set up of Hadoop Standalone setup with hduser.

Step 2: Install Spark with  sparkuser

[code language="java"]

#Login to sparkuser

[root@localhost ~]$ su - sparkuser

#Download the spark tar ball using below command or using URL <a href="http://spark.apache.org/downloads.html">http://spark.apache.org/downloads.html</a>

[sparkuser@localhost ~]$ wget http://d3kbcqa49mib13.cloudfront.net/spark-2.0.2-bin-hadoop2.7.tgz

#Untar above downloaded tar ball

[sparkuser@localhost ~]$ tar -xvf spark-2.0.2-bin-hadoop2.7

[/code]

Step 3. Copy hadoop configuration files

Move two hadoop configuration file core-site.xml, yarn-site.xml to spark set up machine as shown below.

[code language="java"]

# As both user 'hduser' and 'sparkuser' on same machine, we can copy using /tmp/ folder, if the machine is remote then we can even ftp the properties files.

[hduser@localhost hadoop]$ cp etc/hadoop/core-site.xml /tmp/

[hduser@localhost hadoop]$ cp etc/hadoop/yarn-site.xml /tmp/

# Copy the hadoop configuration to Spark machine

[sparkuser@localhost ~]$ mkdir hadoopConf

[sparkuser@localhost ~]$ cd hadoopConf

[sparkuser@localhost hadoopConf]$ cp /tmp/core-site.xml .

[sparkuser@localhost hadoopConf]$ cp /tmp/yarn-site.xml .

[/code]

Step 4: Set up HADOOP_CONF_DIR

In spark-env.sh, set the local path where hadoop configuration files are stored as shown below.

[code language="java"]

# In Spark set up machine, change the <Spark_home>/conf/spark-env.sh

[sparkuser@localhost spark-2.0.2-bin-hadoop2.7]$ nano conf/spark-env.sh

#Earlier stored the hadoop configuration file in hadoopConf

export HADOOP_CONF_DIR=/home/sparkuser/hadoopConf/

[/code]

Problem Faced: Earlier, I tried to avoid copying file to 'sparkuser' and provide the HADOOP_CONF_DIR as '/home/hduser/hadoop/etc/hadoop'.

But, when i submit the spark job I was facing below error. Its when I realized that 'sparkuser' is not able to access file in 'hduser'.

[code language="java"]

[sparkuser@localhost spark-2.0.2-bin-hadoop2.7]$ bin/spark-submit --class org.apache.spark.examples.SparkPi --master yarn --deploy-mode cluster examples/jars/spark-examples_2.11-2.0.2.jar 10

Failure Output:
log4j:WARN No appenders could be found for logger (org.apache.hadoop.util.Shell).
.....
16/12/16 16:19:38 WARN Client: Neither spark.yarn.jars nor spark.yarn.archive is set, falling back to uploading libraries under SPARK_HOME.
16/12/16 16:19:41 INFO Client: <strong>Source and destination file systems are the same. Not copying file:/tmp/spark-6700e780-d8fa-443c-aead-7763ed18ca7d/__spark_libs__7158677467450857723.zip</strong>

....16/12/16 16:19:41 INFO SecurityManager: Changing view acls to: sparkuser
16/12/16 16:19:41 INFO Client: Submitting application application_1481925228457_0007 to ResourceManager
....16/12/16 16:19:45 INFO Client: Application report for application_1481925228457_0007 (state: FAILED)
16/12/16 16:19:45 INFO Client:
client token: N/A
diagnostics: Application application_1481925228457_0007 failed 2 times due to AM Container for appattempt_1481925228457_0007_000002 exited with exitCode: -1000
For more detailed output, check application tracking page:http://localhost:8088/cluster/app/application_1481925228457_0007Then, click on links to logs of each attempt.
Diagnostics: File file:/tmp/spark-6700e780-d8fa-443c-aead-7763ed18ca7d/__spark_libs__7158677467450857723.zip does not exist
<strong>java.io.FileNotFoundException</strong>: File file:/tmp/spark-6700e780-d8fa-443c-aead-7763ed18ca7d/__spark_libs__7158677467450857723.zip does not exist
[/code]

Step 5: Change the Hadoop DFS access permission.

Now, when spark job is executed on Yarn cluster, it will place create directory on HDFS file system. Therefore, 'sparkuser' should have access right on it.

[code language="java"]

#Create /user/sparkuser directory on HDFS and also change permissions

[hduser@localhost ~]$ hadoop fs -mkdir /user/sparkuser

[hduser@localhost ~]$ hadoop fs -chmod 777  /user/sparkuser

# or you can disable permissions on HDFS, change hdfs.site.xml and add below

<property>
<name>dfs.permissions</name>
<value>false</value>
</property>

[/code]

Problem faced: When submit the spark job, I was getting permission issues as shown below

[code language="java"]

[sparkuser@localhost spark-2.0.2-bin-hadoop2.7]$ bin/spark-submit --class org.apache.spark.examples.SparkPi --master yarn --deploy-mode cluster --driver-memory 1g --executor-memory 1g --num-executors 1 examples/jars/spark-examples_2.11-2.0.2.jar 10
log4j:WARN No appenders could be found for logger (org.apache.hadoop.util.Shell).
....
....
16/12/16 17:11:30 INFO Client: Setting up container launch context for our AM
16/12/16 17:11:30 INFO Client: Setting up the launch environment for our AM container
16/12/16 17:11:30 INFO Client: <strong>Preparing resources for our AM container</strong>
<strong>Exception in thread "main" org.apache.hadoop.security.AccessControlException: Permission denied: user=sparkuser, access=WRITE, inode="/user/sparkuser/.sparkStaging/application_1481925228457_0008":hduser:supergroup:drwxr-xr-x</strong>
at org.apache.hadoop.hdfs.server.namenode.FSPermissionChecker.check(FSPermissionChecker.java:319)
......[/code]

Step 6: Run the spark jobs

Now, run the spark job as shown below.

[code language="java"]

#Sumit the job

[sparkuser@localhost spark-2.0.2-bin-hadoop2.7]$ bin/spark-submit  --class org.apache.spark.examples.SparkPi --master yarn --deploy-mode cluster examples/jars/spark-examples_2.11-2.0.2.jar 10

Output:

log4j:WARN No appenders could be found for logger (org.apache.hadoop.util.Shell).
...16/12/16 23:31:51 INFO Client: Submitting application application_1481959535348_0001 to ResourceManager
16/12/16 23:31:52 INFO YarnClientImpl: Submitted application application_1481959535348_0001
16/12/16 23:31:53 INFO Client: Application report for application_1481959535348_0001 (state: ACCEPTED)
...16/12/16 23:33:09 INFO Client: Application report for application_1481959535348_0001 (state: ACCEPTED)
16/12/16 23:33:10 INFO Client: Application report for application_1481959535348_0001 (state: RUNNING)
16/12/16 23:33:10 INFO Client:
client token: N/A
diagnostics: N/A
ApplicationMaster host: 192.168.1.142
ApplicationMaster RPC port: 0
queue: default
start time: 1481959911811
final status: UNDEFINED
tracking URL: http://localhost:8088/proxy/application_1481959535348_0001/
user: pooja
16/12/16 23:33:21 INFO Client: Application report for application_1481959535348_0001 (state: RUNNING)
16/12/16 23:33:22 INFO Client: Application report for application_1481959535348_0001 (state: FINISHED)
16/12/16 23:33:22 INFO Client:
client token: N/A
diagnostics: N/A
ApplicationMaster host: 192.168.1.142
ApplicationMaster RPC port: 0
queue: default
start time: 1481959911811
final status: SUCCEEDED
tracking URL: http://localhost:8088/proxy/<strong>application_1481959535348_0001</strong>/
user: pooja
16/12/16 23:33:23 INFO Client: Deleting staging directory hdfs://localhost:9000/user/pooja/.sparkStaging/application_1481959535348_0001
16/12/16 23:33:24 INFO ShutdownHookManager: Shutdown hook called
16/12/16 23:33:24 INFO ShutdownHookManager: Deleting directory /tmp/spark-d61b8ae1-3dec-4380-8a85-0c615c1e4be1

[/code]

Step 7: Verify job running on YARN

Make sure application  shown on previous output is shown on console as well .

screenshot-from-2016-12-17-00-25-48

Hope you have successfully submit Spark jobs on YARN. Please put your comments if you are facing any issues.

Happy Coding !!!

Wednesday, December 14, 2016

Install Spark on Standalone Mode

Apache Spark

Apache Spark is cluster computing framework written in Scala language. It is gaining popularity as it provides real-time solutions to big data ecosystem.

Installation

Apache spark can be installed on stand alone mode by simply placing the compile version of spark on each node or build it yourself using the source code.

In this tutorial, I will provide details of installation using compile version of spark.

a. Install Java 7+ on machine (if not already installed)

b. Download the Spark tar ball

Download the Spark tar ball using http://spark.apache.org/downloads.html as shown below.

Screenshot from 2016-12-15 15-26-03.png

We need to select the below parameter for download.

  1. Choose a Spark release. You can choose the latest version

  2. Choose the package type. You can select with Hadoop version or with user provided hadoop.Note: Spark uses core Hadoop Library to communicate to HDFS and other Hadoop-supported storage system.Because the protocol changed for different version o HDFS therefore select that build against the same version as version hadoop cluster runs. I have selected the "Pre-build with Hadoop 2.7 and later".

  3. Choose the download type. Select "Direct download".

  4. Download Spark. Click on the link for download tar ball on local machine.

c. Unzip the downloaded tar file

$tar -xvf spark-2.0.2-bin-hadoop2.7.tgz

Below is the folder structure after you extract the tar file as shown below.

screenshot-from-2016-12-15-15-28-20

The description of the important folders:

FolderUsage
sbinContain start, stop master and slave scripts
binContain Scala and Python Spark shell
confContain configuration files
dataContain graph, machine leraning and streaming job data
jarsContains jar included in Spark Classpath
examplesContain example for Spark job
logsContain all log file

d. Start the spark stand alone cluster using below command
cd <Spark Root directory>
sbin/start-master.sh

e. Check if master node is working properly.

In the console, type in the URL http://localhost:8080, it should show up the screen as shown below.

screenshot-from-2016-12-15-15-31-13

f. Start worker node

Now, we will run script sbin/start-slave.sh as shown below.

cd <spark-root-directory>

sbin/start-slave.sh spark://localhost:7077

g. Verify if the worker node is running.

Make sure the http://localhost:8080, UI console, you can see a new Worker Id (worker-20161215153905-192.168.1.142-57869) as shown below.

Screenshot from 2016-12-15 15-44-41.png

h.Running a Spark example

We can run the Spark example job

$./bin/spark-submit --class org.apache.spark.examples.SparkPi --master spark://localhost:7077 examples/jars/spark-examples_2.11-2.0.2.jar 1000


Verify if the console shows below output:

Using Spark's default log4j profile: org/apache/spark/log4j-defaults.properties
16/12/15 21:36:41 INFO SparkContext: Running Spark version 2.0.2
16/12/15 21:36:42 WARN NativeCodeLoader: Unable to load native-hadoop library for your platform... using builtin-java classes where applicable
16/12/15 21:36:42 WARN Utils: Your hostname, localhost.localdomain resolves to a loopback address: 127.0.0.1; using 192.168.1.142 instead (on interface wlp18s0b1)

...........

...........

16/12/15 21:36:51 INFO DAGScheduler: Job 0 finished: reduce at SparkPi.scala:38, took 4.098445 s
Pi is roughly 3.143019143019143
16/12/15 21:36:51 INFO SparkUI: Stopped Spark web UI at http://192.168.1.142:4040
16/12/15 21:36:51 INFO StandaloneSchedulerBackend: Shutting down all executors
16/12/15 21:36:51 INFO CoarseGrainedSchedulerBackend$DriverEndpoint: Asking each executor to shut down
16/12/15 21:36:51 INFO MapOutputTrackerMasterEndpoint: MapOutputTrackerMasterEndpoint stopped!
16/12/15 21:36:51 INFO MemoryStore: MemoryStore cleared
16/12/15 21:36:51 INFO BlockManager: BlockManager stopped
16/12/15 21:36:51 INFO BlockManagerMaster: BlockManagerMaster stopped
16/12/15 21:36:51 INFO OutputCommitCoordinator$OutputCommitCoordinatorEndpoint: OutputCommitCoordinator stopped!

Running multiple instance of Spark Worker on Standalone Mode

In the conf/spark-env.sh, set SPARK_WORKER_INSTANCES to number of worker you want to start and start with start-slave.sh script as shown below

#Add the below line to <Spark_home/conf/spark-env.sh>
export SPARK_WORKER_INSTANCES=2
#Then start the worker threads
sbin/start-slave.sh spark://localhost:7077 --cores 2 --memory 2g

By now, I hope you are able to configure the Spark Stand Alone cluster successfully. If facing any issues, please reply on comments.

Keep Reading and Learning.

Happy Coding!!!