Saturday, October 9, 2021

Running StorageClass Resource on Kubernetes

Introduction

We will learn creating dynamic volume using StorageClass on Minikube today. 

StorageClass

We will create StorageClass, PersistentVolumeClaim, Pod and Service using yaml:

kind: StorageClass
apiVersion: storage.k8s.io/v1
metadata:
  name: slow
provisioner: k8s.io/minikube-hostpath
parameters:
  type: pd-ssd
---
apiVersion: v1
kind: PersistentVolumeClaim
metadata:
  name: ashok-pv-claim
spec:
  accessModes:
    - ReadWriteOnce
  storageClassName: slow
  resources:
    requests:
      storage: 10Gi
---
apiVersion: v1
kind: Pod
metadata:
  name: ashok-pv-pod
  labels:
    app: hello  
spec:
  volumes:
    - name: ashok-pv-storage
      persistentVolumeClaim:
        claimName: ashok-pv-claim
  containers:
    - name: ashok-pv-container
      image: nginx
      ports:
        - containerPort: 80
          name: "http-server"
      volumeMounts:
        - mountPath: "/usr/share/nginx/html"
          name: ashok-pv-storage
---
apiVersion: v1
kind: Service
metadata:
  name: helloweb-svc
  labels:
    app: hello
spec:
  type: LoadBalancer
  ports:
  - port: 8080
    targetPort: 80
  selector:
    app: hello

We need to create an  index.html file for our nignx pod and then use this file in our PersistentVolumeClaim for storage in our Pod.

You can login to Pod using:

$ kubectl exec -it ashok-pv-pod -- /bin/bash
root@ashok-pv-pod:/#
Create index.html file at /usr/share/nginx/html/index.html :

$ echo 'Hello from Kubernetes storage using storage class' > /usr/share/nginx/html/index.html
Create a tunnel to access service in browser:
$ minikube tunnel
🏃  Starting tunnel for service helloweb-svc.
Open the browser  http://localhost:8080/ :


Happy Coding !!


Pass configs to Kubernetes using ConfigMap

Introduction

Today we will learn about ConfigMap Resource of Kubernetes. This is used to pass the configs to Kubernetes resources like Pod, Deployment etc.

ConfigMap

We will create a ConfigMap using yaml:

apiVersion: v1
kind: ConfigMap
metadata:
  name: special-config
  namespace: default
data:
  special.how: very
  log_level: INFO
  SPECIAL_LEVEL: very
  SPECIAL_TYPE: charm
  example.property.file: |-
    property.1=value-1
    property.2=value-2
    property.3=value-3    

We will create the config from above yaml:

$ kubectl apply -f config.yaml
configmap/special-config created
We will use this config in below pod:
apiVersion: v1
kind: Pod
metadata:
  name: ashok-config-pod
spec:
  containers:
    - name: ashok-config-pod
      image: k8s.gcr.io/busybox
      command: [ "/bin/sh", "-c", "env" ]
      env:
        - name: SPECIAL_LEVEL_KEY
          valueFrom:
            configMapKeyRef:
              name: special-config
              key: special.how
        - name: LOG_LEVEL
          valueFrom:
            configMapKeyRef:
              name: special-config
              key: log_level
  restartPolicy: Never
Let's apply above yaml:
$ kubectl apply -f pod.yaml
pod/ashok-config-pod created
We can check the status of the pod:
$ kubectl get po
NAME               READY   STATUS      RESTARTS   AGE
ashok-config-pod   0/1     Completed   0          48s
We can see the status is  completed for our pod. To check our configs passed as environment variables will be visible in the logs.
$ kubectl logs ashok-config-pod
KUBERNETES_SERVICE_PORT=443
KUBERNETES_PORT=tcp://10.96.0.1:443
LOG_LEVEL=INFO                         <--- Our config from the ConfigMap Resource
HOSTNAME=ashok-config-pod
SHLVL=1
HOME=/root
ASHOK_SVC_SERVICE_HOST=10.106.81.159 
KUBERNETES_PORT_443_TCP_ADDR=10.96.0.1
ASHOK_SVC_PORT=tcp://10.106.81.159:80
ASHOK_SVC_SERVICE_PORT=80
PATH=/usr/local/sbin:/usr/local/bin:/usr/sbin:/usr/bin:/sbin:/bin
KUBERNETES_PORT_443_TCP_PORT=443
KUBERNETES_PORT_443_TCP_PROTO=tcp
ASHOK_SVC_PORT_80_TCP_ADDR=10.106.81.159
SPECIAL_LEVEL_KEY=very                 <--- Our config from the ConfigMap Resource
ASHOK_SVC_PORT_80_TCP_PORT=80
ASHOK_SVC_PORT_80_TCP_PROTO=tcp
KUBERNETES_SERVICE_PORT_HTTPS=443
KUBERNETES_PORT_443_TCP=tcp://10.96.0.1:443
PWD=/
KUBERNETES_SERVICE_HOST=10.96.0.1
ASHOK_SVC_PORT_80_TCP=tcp://10.106.81.159:80
We will use another pod yaml to see the example.property.file :
apiVersion: v1
kind: Pod
metadata:
  name: ashok-config-pod
spec:
  containers:
    - name: ashok-config-pod
      image: k8s.gcr.io/busybox
      command: [ "/bin/sh", "-c", "ls /etc/config/" ]
      volumeMounts:
      - name: config-volume
        mountPath: /etc/config
  volumes:
    - name: config-volume
      configMap:
        # Provide the name of the ConfigMap containing the files you want
        # to add to the container
        name: special-config
  restartPolicy: Never
Similarly you can check the configs in logs.

Happy Coding !!

Create PersistentVolume, PersistentVolume on Kubernetes

Introduction

I will show how to create PersistentVolume and PersistentVolumeClaim on Kubernetes. I am using Minikube for our learning.

We will first create an  index.html file for our Nginx pod and then use this file in our PersistentVolume and PersistentVolumeClaim for storage in our Pod.

Storage

You can login to Minikube using:

$ minikube ssh
Last login: Sun Oct 10 01:14:15 2021 from 192.168.49.1
docker@minikube:~$
We will now create index.html file at /mnt/data/index.html :
$ sudo mkdir /mnt/data
$ sudo sh -c "echo 'Hello from PVC example' > /mnt/data/index.html"

PersistentVolume

We can create a PersistentVolume using yaml:

apiVersion: v1
kind: PersistentVolume
metadata:
  name: ashok-pv-vol
  labels:
    type: local
spec:
  storageClassName: manual
  capacity:
    storage: 20Gi
  accessModes:
    - ReadWriteOnce
  hostPath:
    path: "/mnt/data"

Apply the PV:

$ kubectl apply -f pv.yaml
persistentvolume/ashok-pv-vol created

We can check the status of the PersistentVolume:

$ kubectl get pv
NAME           CAPACITY   ACCESS MODES   RECLAIM POLICY   STATUS      CLAIM   STORAGECLASS   REASON   AGE
ashok-pv-vol   20Gi       RWO            Retain           Available           manual                  4s

PersistentVolumeClaim

We will create an PersistentVolumeClaim using yaml:

apiVersion: v1
kind: PersistentVolumeClaim
metadata:
  name: ashok-pv-claim
spec:
  storageClassName: manual
  accessModes:
    - ReadWriteOnce
  resources:
    requests:
      storage: 20Gi

PersistentVolumeClaim can be created as below:

$ kubectl apply -f pvc.yaml
persistentvolumeclaim/ashok-pv-claim created

We can check the status of the PersistentVolumeClaim:

$ kubectl get pvc
NAME             STATUS   VOLUME         CAPACITY   ACCESS MODES   STORAGECLASS   AGE
ashok-pv-claim   Bound    ashok-pv-vol   20Gi       RWO            manual         8s

The persistent volume status is now changed to bound :

$ kubectl get pv
NAME           CAPACITY   ACCESS MODES   RECLAIM POLICY   STATUS   CLAIM                    STORAGECLASS   REASON   AGE
ashok-pv-vol   20Gi       RWO            Retain           Bound    default/ashok-pv-claim   manual                  2m31s

Let's create a pod for using the static volume.

Using PVC in Pod


We will create a pod using yaml:
apiVersion: v1
kind: Pod
metadata:
  name: ashok-pv-pod
spec:
  volumes:
    - name: ashok-pv-storage
      persistentVolumeClaim:
        claimName: ashok-pv-claim
  containers:
    - name: ashok-pv-container
      image: nginx
      ports:
        - containerPort: 80
          name: "http-server"
      volumeMounts:
        - mountPath: "/usr/share/nginx/html"
          name: ashok-pv-storage

Let's create pod:
$ kubectl apply -f pv-pod.yaml
pod/ashok-pv-pod created
We will check the status of the pod:
$ kubectl get po
NAME           READY   STATUS    RESTARTS   AGE
ashok-pv-pod   1/1     Running   0          79s
To make this pod accessible from browser, you can use  kubectl port-forward :
$ kubectl port-forward nginx 8888:80
Forwarding from 127.0.0.1:8888 -> 80
Forwarding from [::1]:8888 -> 80

Open the browser  http://localhost:8888/ :

Clean Up

We can delete the pod, pvc and pv using below commands:

$ kubectl delete po ashok-pv-pod
pod "ashok-pv-pod" deleted
$ kubectl delete pvc ashok-pv-claim
persistentvolumeclaim "ashok-pv-claim" deleted
$ kubectl delete pv ashok-pv-vol
persistentvolume "ashok-pv-vol" deleted

Let me know if you need any help.

Happy Coding !!!

Wednesday, October 6, 2021

Running ReplicaSet on Kubernetes

Introduction

I was trying to understand the Replicaset and wanted to see if we can run it directly and can it be accessible like Deployment Resource.

ReplicaSet

The YAML for the replicaset is:

apiVersion: apps/v1
kind: ReplicaSet
metadata:
  name: helloweb-rs
  labels:
    app: hello
spec:
  replicas: 3
  selector:
    matchLabels:
      app: hello
  template:
    metadata:
      labels:
        app: hello
    spec:
      containers:
       - name: hello-app
         image: gcr.io/google-samples/hello-app:1.0
         ports:
         - containerPort: 8080

I launched the 3 pods using the above YAML.
$ kubectl apply -f replicaset.yaml
replicaset.apps/helloweb-rs created
The status of the K8 cluster:

$ kubectl get all
NAME                    READY   STATUS    RESTARTS   AGE
pod/helloweb-rs-8grmh   1/1     Running   0          6s
pod/helloweb-rs-9bstq   1/1     Running   0          6s
pod/helloweb-rs-rzjc8   1/1     Running   0          6s

NAME                 TYPE        CLUSTER-IP   EXTERNAL-IP   PORT(S)   AGE
service/kubernetes   ClusterIP   10.96.0.1    <none>        443/TCP   42h

NAME                          DESIRED   CURRENT   READY   AGE
replicaset.apps/helloweb-rs   3         3         3       6s

Created load balancer service YAML

apiVersion: v1
kind: Service
metadata:
  name: helloweb-svc
  labels:
    app: hello
spec:
  type: LoadBalancer
  ports:
  - port: 80
    targetPort: 8080
  selector:
    app: hello

Launched it via kubectl:

$ kubectl apply -f service-lb.yaml
service/helloweb-svc created

The status of the service
$ kubectl get all
NAME                    READY   STATUS    RESTARTS   AGE
pod/helloweb-rs-8grmh   1/1     Running   0          3m9s
pod/helloweb-rs-9bstq   1/1     Running   0          3m9s
pod/helloweb-rs-rzjc8   1/1     Running   0          3m9s

NAME                   TYPE           CLUSTER-IP      EXTERNAL-IP   PORT(S)        AGE
service/helloweb-svc   LoadBalancer   10.102.140.85   localhost     80:30971/TCP   6s
service/kubernetes     ClusterIP      10.96.0.1       <none>        443/TCP        42h

NAME                          DESIRED   CURRENT   READY   AGE
replicaset.apps/helloweb-rs   3         3         3       3m9s

Open the http://localhost/ in browser:


Happy Coding !!

Monday, October 4, 2021

Types of Service on Kubernetes

Introduction

There are 4 types of service by which we can expose our deployments on Kubernetes. I am using docker-desktop as Kubernetes local cluster.

The application running in pods has their own IP address, they are given a single DNS name for a set od pods. Managing the connection of these pods to external world is not easy, we use K8 services resources to overcome this challenge. Services are an abstract way to expose an application running on a set of pods.

LoadBalancer

We are using the https://github.com/GoogleCloudPlatform/kubernetes-engine-samples/tree/main/hello-app app for deployment. It's already available publicly as docker image.

Load balancer type of service exposes the pod to external world.


I have created a deployment using below command:
$ kubectl create deployment hello-server --image=us-docker.pkg.dev/google-samples/containers/gke/hello-app:1.0
deployment.apps/hello-server created
Check the status using below command:
$ kubectl get all
NAME                                READY   STATUS    RESTARTS   AGE
pod/hello-server-5bd6b6875f-8p2c2   1/1     Running   0          18s

NAME                 TYPE        CLUSTER-IP   EXTERNAL-IP   PORT(S)   AGE
service/kubernetes   ClusterIP   10.96.0.1    <none>        443/TCP   47m

NAME                           READY   UP-TO-DATE   AVAILABLE   AGE
deployment.apps/hello-server   1/1     1            1           18s

NAME                                      DESIRED   CURRENT   READY   AGE
replicaset.apps/hello-server-5bd6b6875f   1         1         1       18s
We will expose the above application running in pods using the load balancer type of service using below command:
$ kubectl expose deployment hello-server --type LoadBalancer --port 80 --target-port 8080
service/hello-server exposed
Check the status using below command:
$ kubectl get all
NAME                                READY   STATUS    RESTARTS   AGE
pod/hello-server-5bd6b6875f-8p2c2   1/1     Running   0          65s

NAME                   TYPE           CLUSTER-IP      EXTERNAL-IP   PORT(S)        AGE
service/hello-server   LoadBalancer   10.111.116.63   localhost     80:30770/TCP   5s
service/kubernetes     ClusterIP      10.96.0.1       <none>        443/TCP        47m

NAME                           READY   UP-TO-DATE   AVAILABLE   AGE
deployment.apps/hello-server   1/1     1            1           65s

NAME                                      DESIRED   CURRENT   READY   AGE
replicaset.apps/hello-server-5bd6b6875f   1         1         1       65s
If you were running it on GCP then the service was accessible on External-Ip of the service. But here we are running on minikube so you need a tunnel. 

Run minikube tunnel  in a new terminal: 

$  minikube tunnel
🏃  Starting tunnel for service hello-server.
Open the browser  http://localhost/ :


To delete the service:

$ kubectl delete svc hello-server
service "hello-server" deleted

NodePort

For exposing the NodePort Service for a set of pods where each port listens on `targetPort` and maps it to `port` :
$ kubectl expose deployment hello-server --type NodePort --port 8080
service/hello-server exposed
Use port-forward to see the response in the browser:
$ kubectl port-forward service/hello-server 7080:8080
Forwarding from 127.0.0.1:7080 -> 8080
Forwarding from [::1]:7080 -> 8080

Open the browser  http://localhost:7080/ :

To delete the service:

$ kubectl delete svc hello-server
service "hello-server" deleted

ClusterIP


It is the default type. To configure service, use below command:

$ kubectl expose deployment hello-server --type=ClusterIP --port=80 --target-port 8080
service/hello-server exposed

Check the status of the service:

$ kubectl get svc
NAME           TYPE        CLUSTER-IP     EXTERNAL-IP   PORT(S)   AGE
hello-server   ClusterIP   10.98.172.12   <none>        80/TCP    15s
We can access the service via browser by ingress manifest. But you can check via entering the pod.

$ kubectl get po
NAME                            READY   STATUS    RESTARTS   AGE
hello-server-5bd6b6875f-8p2c2   1/1     Running   0          37m
Use the pod name, to login into the pod:
$ kubectl exec -it hello-server-5bd6b6875f-8p2c2 -- sh
/ #
There is no curl in the container. Install curl:
$ apk add --no-cache curl
/ # apk add --no-cache curl
fetch https://dl-cdn.alpinelinux.org/alpine/v3.14/main/x86_64/APKINDEX.tar.gz
fetch https://dl-cdn.alpinelinux.org/alpine/v3.14/community/x86_64/APKINDEX.tar.gz
(1/5) Installing ca-certificates (20191127-r5)
(2/5) Installing brotli-libs (1.0.9-r5)
(3/5) Installing nghttp2-libs (1.43.0-r0)
(4/5) Installing libcurl (7.79.1-r0)
(5/5) Installing curl (7.79.1-r0)
Executing busybox-1.33.1-r3.trigger
Executing ca-certificates-20191127-r5.trigger
OK: 8 MiB in 19 packages
In the container, make a request to your Service by using your cluster IP address and port 80. Notice that 80 is the value of the port field of your Service. This is the port that you use as a client of the Service.

$ kubectl exec -it hello-server-5bd6b6875f-8p2c2 -- sh
/ # curl http://10.98.172.12/
Hello, world!
Version: 1.0.0
Hostname: hello-server-5bd6b6875f-8p2c2
To delete the service:

$ kubectl delete svc hello-server
service "hello-server" deleted

You can create an ingress and access it.

HeadLess

I will soon


Happy Coding !!!


Running Pod on Kubernetes

Introduction

I want to test the docker-desktop as K8 local cluster. This is not production deployment.

Using Kubectl

$ kubectl run nginx --image=nginx --restart=Never
pod/nginx created

This will create a pod  nginx pod. To make this pod accessible from browser, you can use  kubectl port-forward :

$ kubectl port-forward nginx 8888:80
Forwarding from 127.0.0.1:8888 -> 80
Forwarding from [::1]:8888 -> 80

Open the browser  http://localhost:8888/ :

You can log into the pod and check the logs as well.
$ kubectl logs nginx
/docker-entrypoint.sh: /docker-entrypoint.d/ is not empty, will attempt to perform configuration
/docker-entrypoint.sh: Looking for shell scripts in /docker-entrypoint.d/
/docker-entrypoint.sh: Launching /docker-entrypoint.d/10-listen-on-ipv6-by-default.sh
10-listen-on-ipv6-by-default.sh: info: Getting the checksum of /etc/nginx/conf.d/default.conf
10-listen-on-ipv6-by-default.sh: info: Enabled listen on IPv6 in /etc/nginx/conf.d/default.conf
/docker-entrypoint.sh: Launching /docker-entrypoint.d/20-envsubst-on-templates.sh
/docker-entrypoint.sh: Launching /docker-entrypoint.d/30-tune-worker-processes.sh
/docker-entrypoint.sh: Configuration complete; ready for start up
2021/10/05 05:42:13 [notice] 1#1: using the "epoll" event method
2021/10/05 05:42:13 [notice] 1#1: nginx/1.21.3
2021/10/05 05:42:13 [notice] 1#1: built by gcc 8.3.0 (Debian 8.3.0-6)
2021/10/05 05:42:13 [notice] 1#1: OS: Linux 5.10.47-linuxkit
2021/10/05 05:42:13 [notice] 1#1: getrlimit(RLIMIT_NOFILE): 1048576:1048576
2021/10/05 05:42:13 [notice] 1#1: start worker processes
2021/10/05 05:42:13 [notice] 1#1: start worker process 32
2021/10/05 05:42:13 [notice] 1#1: start worker process 33
2021/10/05 05:42:13 [notice] 1#1: start worker process 34
2021/10/05 05:42:13 [notice] 1#1: start worker process 35
2021/10/05 05:42:13 [notice] 1#1: start worker process 36
2021/10/05 05:42:13 [notice] 1#1: start worker process 37
127.0.0.1 - - [05/Oct/2021:05:43:38 +0000] "GET / HTTP/1.1" 200 615 "-" "Mozilla/5.0 (Macintosh; Intel Mac OS X 10_15_7) AppleWebKit/537.36 (KHTML, like Gecko) Chrome/94.0.4606.71 Safari/537.36" "-"
127.0.0.1 - - [05/Oct/2021:05:43:38 +0000] "GET /favicon.ico HTTP/1.1" 404 555 "http://localhost:8888/" "Mozilla/5.0 (Macintosh; Intel Mac OS X 10_15_7) AppleWebKit/537.36 (KHTML, like Gecko) Chrome/94.0.4606.71 Safari/537.36" "-"
2021/10/05 05:43:38 [error] 34#34: *2 open() "/usr/share/nginx/html/favicon.ico" failed (2: No such file or directory), client: 127.0.0.1, server: localhost, request: "GET /favicon.ico HTTP/1.1", host: "localhost:8888", referrer: "http://localhost:8888/"
127.0.0.1 - - [05/Oct/2021:05:43:40 +0000] "GET / HTTP/1.1" 304 0 "-" "Mozilla/5.0 (Macintosh; Intel Mac OS X 10_15_7) AppleWebKit/537.36 (KHTML, like Gecko) Chrome/94.0.4606.71 Safari/537.36" "-"
127.0.0.1 - - [05/Oct/2021:05:43:41 +0000] "GET / HTTP/1.1" 304 0 "-" "Mozilla/5.0 (Macintosh; Intel Mac OS X 10_15_7) AppleWebKit/537.36 (KHTML, like Gecko) Chrome/94.0.4606.71 Safari/537.36" "-"

Using YAML

You can create a pod using yaml file as well.
apiVersion: v1
kind: Pod
metadata:
  name: demo
spec:
  containers:
  - name: testpod
    image: alpine:3.5
    command: ["ping", "8.8.8.8"]
Save the above manifest to pod.yaml

$ kubectl apply -f pod.yaml
pod/testpod created
Once the pod is created you can check the pod status kubectl get po :
$ kubectl get po
NAME      READY   STATUS    RESTARTS   AGE
testpod   1/1     Running   0          4s
As this pod makes a ping to 8.8.8.8, you can check the pod running by seeing the log messages.
$ kubectl logs testpod
PING 8.8.8.8 (8.8.8.8): 56 data bytes
64 bytes from 8.8.8.8: seq=0 ttl=37 time=22.417 ms
64 bytes from 8.8.8.8: seq=1 ttl=37 time=14.821 ms
64 bytes from 8.8.8.8: seq=2 ttl=37 time=13.588 ms

We have seen we can run the pod using above 2 methods. 

Happy Coding!!

Saturday, October 2, 2021

Run Kubernetes on Google Kubernetes Engine

Introduction

I was interested to learn Kubernetes. I tried to run the K8s on Minikube as well on macOS. There are some limitations in minikube on macOS so I tried it on GKE.

Account Setup on GKE

I followed below steps to signup on GCP. 

Open the link https://console.cloud.google.com/ on browser. 


Sign in using your email and password.


You will have to agree the terms.


Click on Activate button top right corner.


Choose the country and organization needs. 

There will be 2 more steps to Verify by phone number  and  Add credit card details . There will be charges if you don't stop after trial period or you exhaust $300 credit. 

After signup you will land on the home page like below.


Google Kubernetes Engine

You can access GKE from left hand navigation by click on Kubernetes Engine >> Clusters. 


If you are using it first time then you will have to enable it for you.


Click on create and it will open below page


Click on Configure  against GKE Standard. It will open below. 


Click on Create  button on the bottom of the page. It will open cluster page and will start the cluster for you. 

In few minutes cluster will be running state. 


The green dot o on the status shows the cluster is up and running. You can check the cluster details by clicking on cluster-1  link under name. Refer below. 


The cluster has 3 nodes.


Google Cloud Shell 

We will cloud shell to launch k8. 

Click on icon top right corner Cloud Shell - Spring Boot on GCP 

Refer below screenshot.


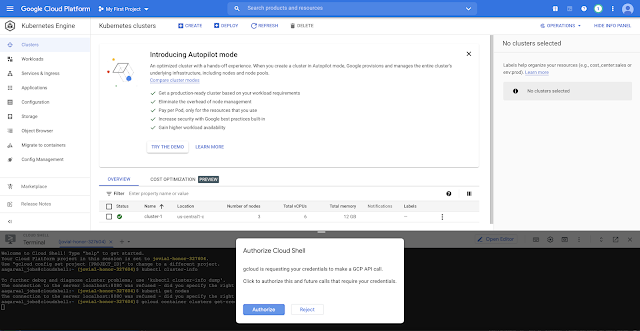
It will take few minutes to provision cloud instance and then provide a shell in bottom of the page.


You can now start typing your commands on the shell.

gcloud container clusters get-credentials cluster-1 --zone "us-central1-c"

This will open a pop-up and ask you to  authorize . You can click on authorize  button. 

The cloud shell will now have access to connect with GKE cluster. The output on shell will look like below:

aagarwal_jobs@cloudshell:~ (jovial-honor-327604)$ gcloud container clusters get-credentials cluster-1 --zone "us-central1-c"
Fetching cluster endpoint and auth data.
kubeconfig entry generated for cluster-1.
aagarwal_jobs@cloudshell:~ (jovial-honor-327604)$

Run below command to launch a hello-server using docker image from google container registry.

kubectl create deployment hello-server --image=us-docker.pkg.dev/google-samples/containers/gke/hello-app:1.0

Output will be like below:

aagarwal_jobs@cloudshell:~ (jovial-honor-327604)$ kubectl create deployment hello-server --image=us-docker.pkg.dev/google-samples/containers/gke/hello-app:1.0
deployment.apps/hello-server created
aagarwal_jobs@cloudshell:~ (jovial-honor-327604)$
Expose the deployment via service.

kubectl expose deployment hello-server --type LoadBalancer --port 80 --target-port 8080
Output will be like below:

aagarwal_jobs@cloudshell:~ (jovial-honor-327604)$ kubectl expose deployment hello-server --type LoadBalancer --port 80 --target-port 8080
service/hello-server exposed
aagarwal_jobs@cloudshell:~ (jovial-honor-327604)$

Inspect and view the application

Inspect the running Pods by using kubectl get pods :

aagarwal_jobs@cloudshell:~ (jovial-honor-327604)$ kubectl get pods
NAME                            READY   STATUS    RESTARTS   AGE
hello-server-5bd6b6875f-p2z64   1/1     Running   0          6m46s
aagarwal_jobs@cloudshell:~ (jovial-honor-327604)$

You should see one hello-server Pod running on your cluster.

Inspect the hello-server Service by using  kubectl get service :

aagarwal_jobs@cloudshell:~ (jovial-honor-327604)$ kubectl get service
NAME           TYPE           CLUSTER-IP   EXTERNAL-IP    PORT(S)        AGE
hello-server   LoadBalancer   10.8.13.54   34.72.114.79   80:30778/TCP   6m
kubernetes     ClusterIP      10.8.0.1     <none>         443/TCP        33m
aagarwal_jobs@cloudshell:~ (jovial-honor-327604)$
From this command's output, copy the hello-server Service's external IP address from the EXTERNAL-IP column.
Note: You might need to wait several minutes before the Service's external IP address populates. If the application's external IP is <pending>, run kubectl get again.

View the application from your web browser by using the external IP address with the exposed port:
http://EXTERNAL_IP
As the external ip is 34.72.114.79.

http://34.72.114.79
You have just deployed a containerized web application to GKE.


Clean up 

To avoid incurring charges to your Google Cloud account for the resources used in this page, follow these steps.

Delete the application's Service by running using  kubectl delete :
aagarwal_jobs@cloudshell:~ (jovial-honor-327604)$ kubectl delete service hello-server
service "hello-server" deleted
aagarwal_jobs@cloudshell:~ (jovial-honor-327604)$
This command deletes the Compute Engine load balancer that you created when you exposed the Deployment.

Delete your cluster by running  gcloud container clusters delete:

aagarwal_jobs@cloudshell:~ (jovial-honor-327604)$ gcloud container clusters delete cluster-1 --zone "us-central1-c"
The following clusters will be deleted.
 - [cluster-1] in [us-central1-c]

Do you want to continue (Y/n)?  Y

Deleting cluster cluster-1...done.     
Deleted [https://container.googleapis.com/v1/projects/jovial-honor-327604/zones/us-central1-c/clusters/cluster-1].
aagarwal_jobs@cloudshell:~ (jovial-honor-327604)$
The cluster will be deleted once you run the delete command.


Happy Coding !!!